Welcome to Part 3 in our series where we’re walking through the process to deploy a shared GID. In Post 1, we started with installing and configuring a local Certificate Authority and Active Directory Federation Server. Then in part 2, we walked through how to do our initial installation of a standalone Griffeye Intelligence Database and to secure it using ADFS for a unified authentication system within our local network.
Now in part 3 we’ll walk through the process to configure our ADFS server and GID for external authentication and access. This will involve 3 primary sections involving:
- Generating an updated certificate containing subject alternate names for an external/public domain name.
- Updating ADFS to use the new certificate and public domain name.
- Updating the GID configurations to also be reachable from the external domain name.
Let’s dive in…
Subject Alternate Name (SAN) Certificate Template Setup
- From Server Manager Click, ‘Tools’, and ‘Certificate Authority’.

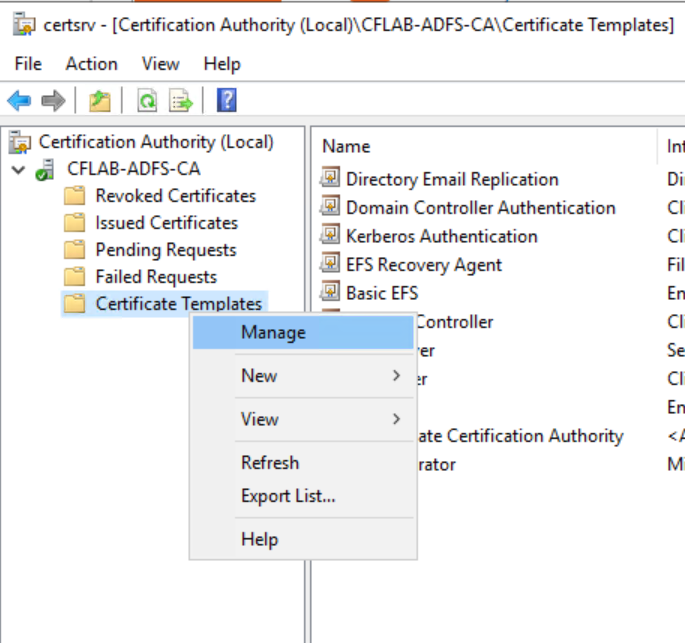
- Within the Certificate Authority window, expand the newly create certificate authority, right-click on ‘Certificate Templates’ and click ‘Manage.
- This will open the ‘Certificate Templates Console’. Locate the ‘Computer’ template in right pane and click ‘Duplicate Template’.

- A new window for the properties of the new template will open. Click on the ‘General’ tab and give the certificate template a unique name. To distinguish this new SAN specific template from others we’ll call it “SAN ADFS SSL”.
- Under Validity period adjust certificate validity years as desired. Finally, check the box for ‘Publish certificate in Active Directory’.

- Next go to the ‘Request Handling’ screen and check the box for ‘Allow private key to be exported’.

- Now go to the ‘Security’ tab. Here we need to add permissions for the ADFS server computer that we will be installing ADFS on.
Click ‘Add’

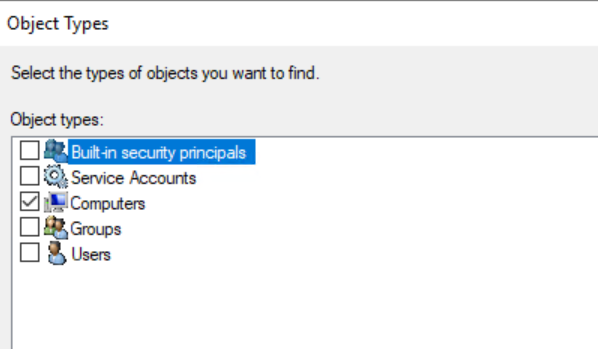
Click ‘Object Types’, check ‘Computers’, and click ‘OK.
Now enter the hostname of the computer you’re installing ADFS on and click ‘Check Names’ to confirm, and click OK if validated.

Select the ADFS computer, and give it “Full Control”.

- Next Click the ‘Subject Name’ tab. Previously when only needing to access ADFS internally, we used the ‘Build from this Active Directory’ option. However in order to correctly configure external connections and valid SSL connections we’ll need to supply additional ‘Subject Alternate Names’ when generating our certificate. Therefore we’ll click on the option for ‘Supply in Request’, and will be specifying the SAN values in a later step. Click ‘Apply’, and ‘Ok’ to close the window.

- Now return to the ‘Certificate Authority’ window. Right click on ‘Certificate Templates, Click ‘New’, and ‘Certificate Template to Issue’.

- In the window that opens select the newly created ‘SAN ADFS SSL’ certificate template you made in moment ago and click ‘OK’.

SAN Certificate Generation
Now that we have the certificate template configured we’ll use the Certificates Snap-in Console to generate the actual certificate we’ll be using.
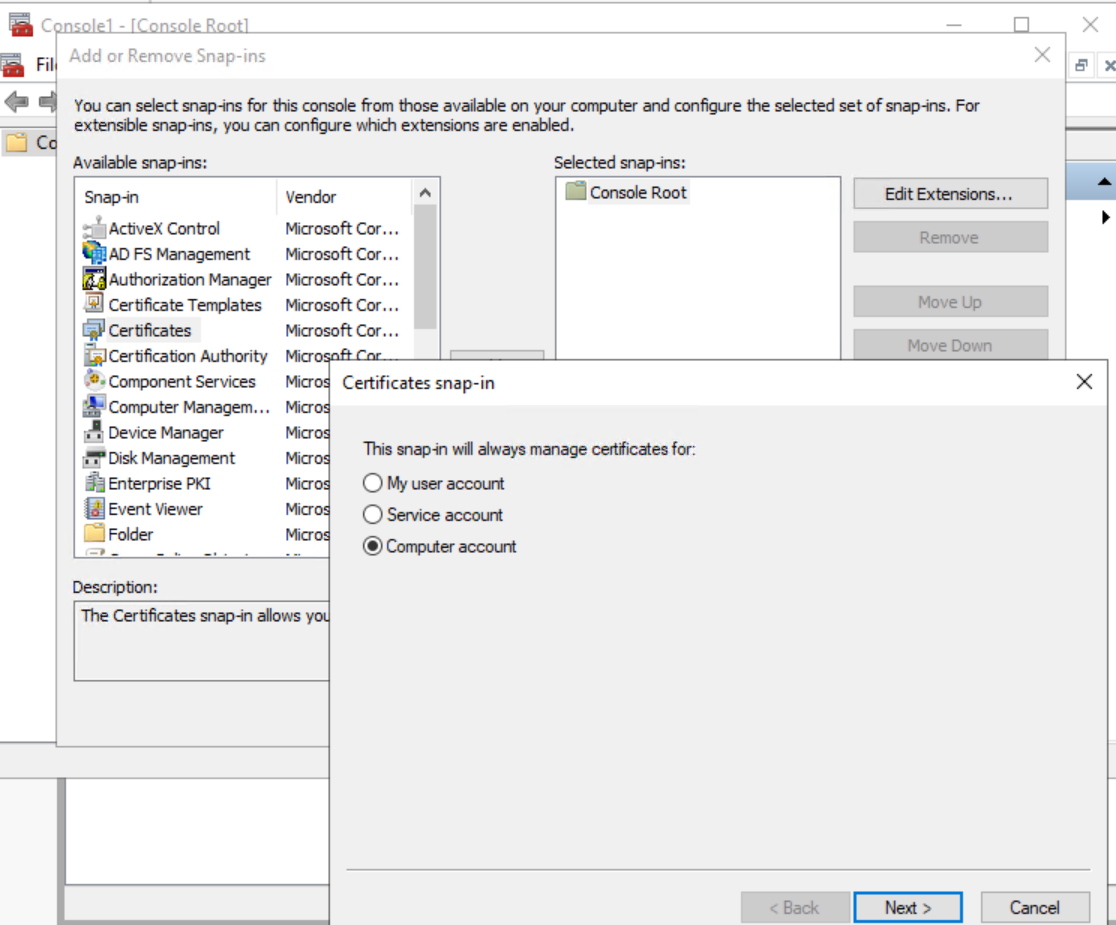
- Open the Windows ‘Run’ window and launch ‘mmc’.

- Go to File, Add Snap-in, and Select ‘Certificates’ from the ‘Available Snap-ins’. Select the option for ‘Computer Account’. Click ‘Next’, select Local Computer, and click ‘Finish’, then Ok to add the Snap-in.
- Expand ‘Certificates’, Right-Click ‘Personal, Select ‘All Tasks’, and ‘Request New Certificate’.

- Click ‘Next’ on first window and then select the check the new SAN ADFS SSL certificate and select then click on the blue warning message to supply the additional required settings.

- You’ll then have a certificate properties window open. Here we’ll need to add all of the ‘alternatives names’ that we’d like the SSL certificate to secure. We can designate as many variations as we want so we can use the same certificate to secure multiple SSL connections regardless of whether we use an internal name or public domain name. In the following figure I’ve added several alternate names that I plan to use this single certificate for. I have also filled out the common name field and just used the local host name for the ADFS server, and also assigned an ‘Organization’ name. The specific common name you use and Organization name is not critical and you can use whatever values make sense and apply to your particular network and configuration. The most critical aspect is ensuring you have all possible alternative names entered.

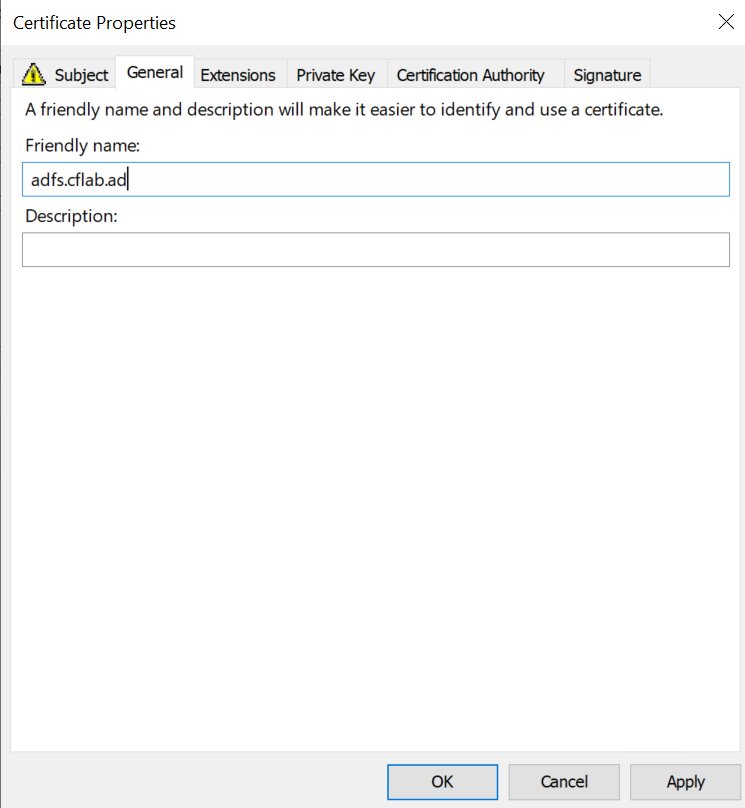
- Click Apply, then select the ‘General’ tab. Under ‘Friendly Name’, enter the same domain name you used in the ‘common name’ field under last tab. Then click ‘Apply’, ‘Ok’, and finally click the ‘Enroll’ button to finalize generation of the new SAN certificate.
- You should now have a certificate available under ‘Personal’, and ‘Certificates’.

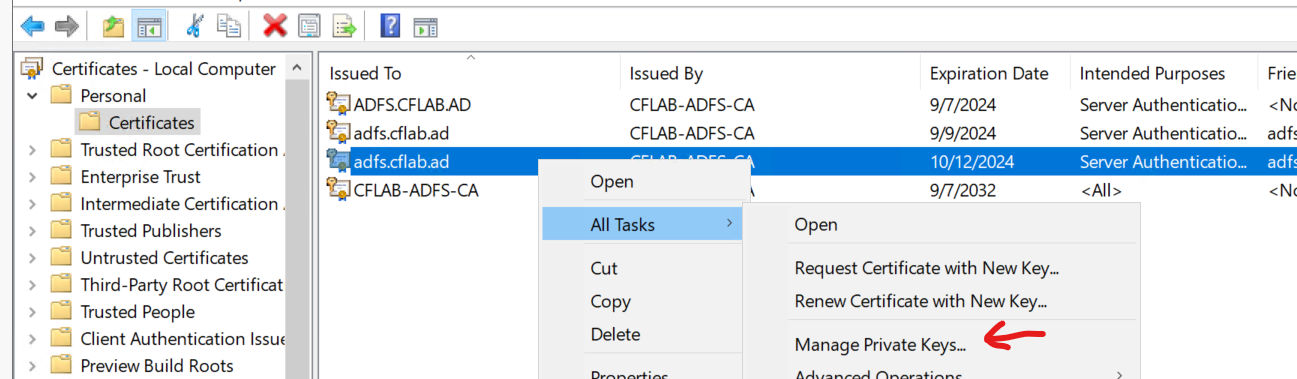
- Now we need to ensure the ADFS Service Accounts have read access to the newly created certificate. Right-click on the new certificate, click ‘All Tasks’, and click ‘Manage Private Keys…’.
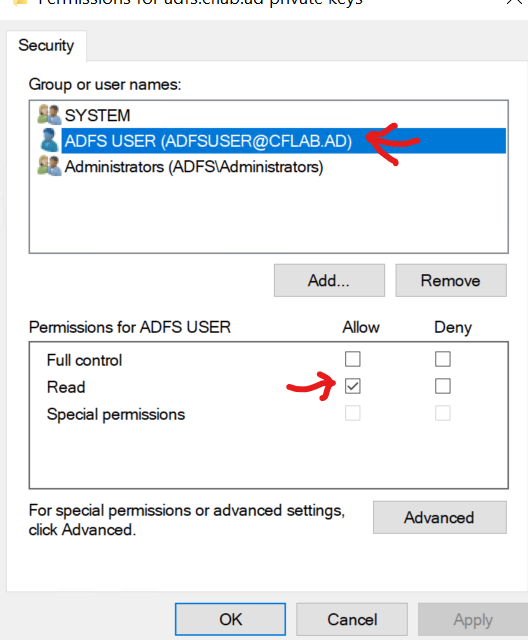
- Click ‘Add’ and locate the domain ADFS User service account you created previously that the ADFS service runs under, and give ‘Read’ access to that account:
- Before we leave we need to take not of the new thumbprint value for the new SAN certificate. This can be accessed by double-clicking on the certificate, open the ‘details’ tab, and at the bottom of listed fields you’ll find the ‘thumbprint’ value. Copy this off to another location temporarily for later:

Now we need to tell our services such as ADFS to switch over to using this new SAN certificate.
- Finally before we leave we need to export a copy of the SAN certificate along with the private keys for later installation on our GID server. This can be done by right-clicking on the certificate, go to ‘All Tasks’, and select ‘export’.

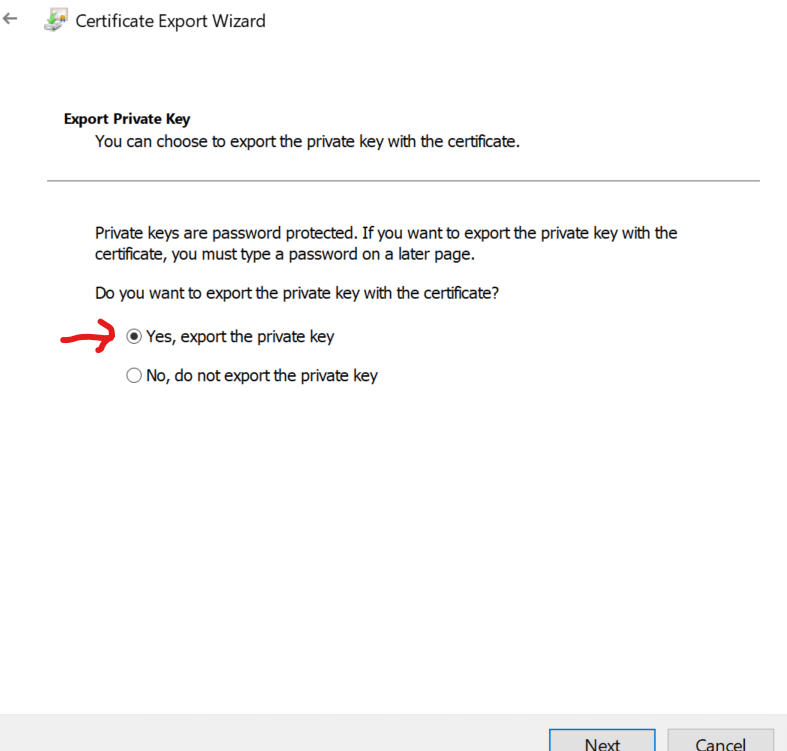
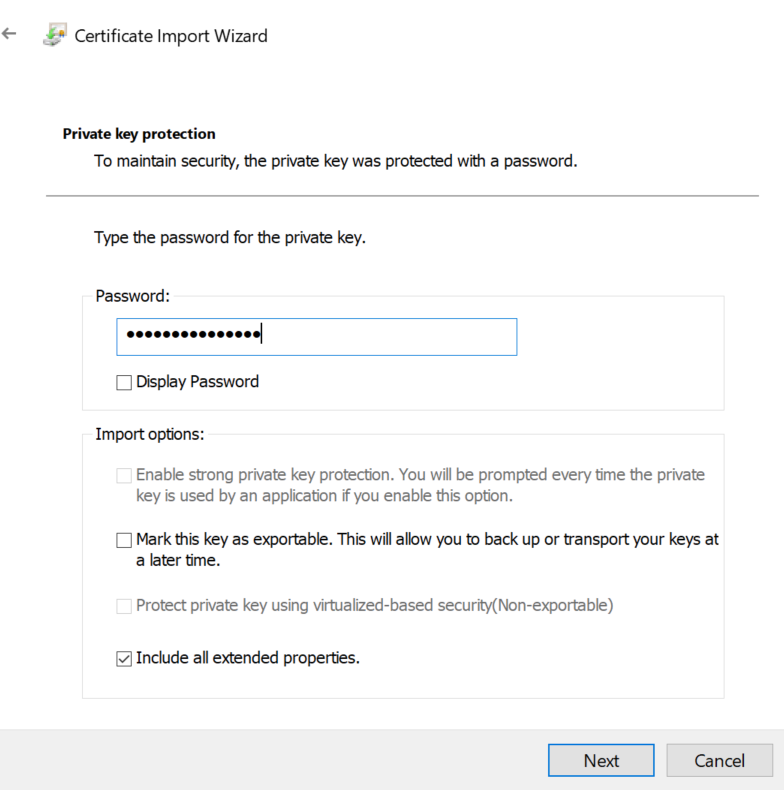
- On the Export Wizard, make sure to select ‘Yes, export the private key’ and then click next.
The defaults should be acceptable and should look like the figure below:
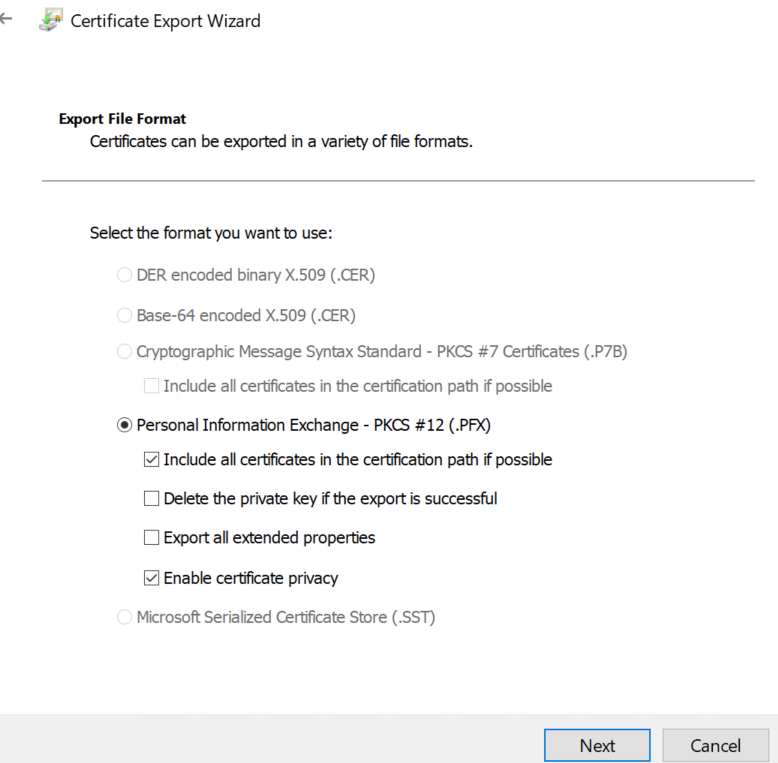
- On the security window select the password option, set the password of your choice, and click next. Designate a location to save the certificate to, click ‘Next’, and Finish.
Hold onto this certificate, as we’ll need it in later steps.
ADFS Endpoint Name Change
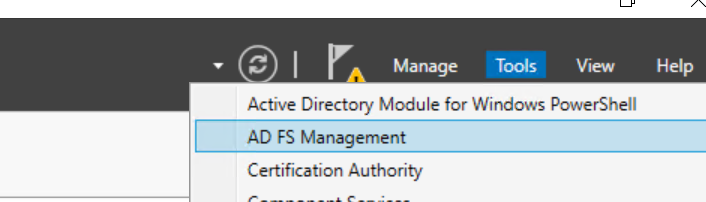
- Open the ADFS Admin Console from the ‘Tools’ menu in the ‘Server Manager’:
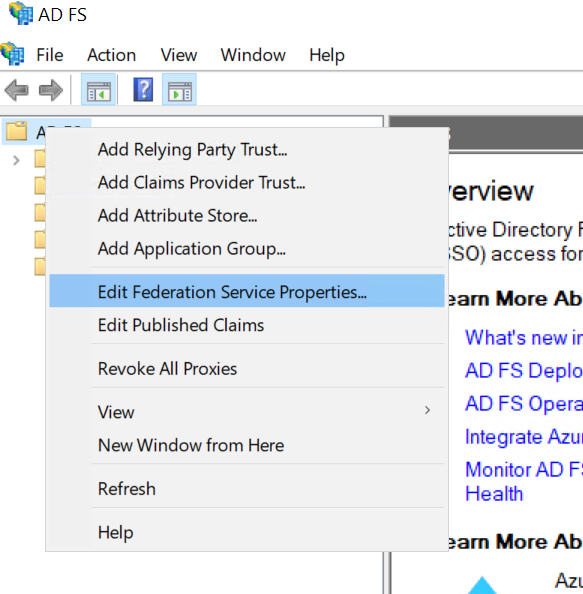
- Right click on the root ‘AD FS’ folder and select ‘Edit Federation Service Properties’:
- Locate the two boxes for ‘Federation Service Name’ and ‘Federation Service Identifier’. To configure ADFS for external connections we need to change our ADFS server’s local hostname in these fields and replace it with the public domain name that will be reachable by remote clients. This should match the public ADFS URL you added in the Subject Alternate Name field when creating a SAN certificate in the prior steps:

After updating the URL, click ‘Apply’ and ‘Close’.
ADFS SAN Certificate Update/Change
- Now expand the ‘Service’ menu, locate ‘Certificates’, right-click on ‘Certificates and select ‘Set Service Communications Certificate’.

- A certificate selection box will come up and you’ll need to click ‘More choices’ to see all the available certificates. Then select the new SAN certificate you just created (most likely the most recently dated option):

- Finally we need to change over the certificate bindings in order to bind the new SAN certificate to the ports used by ADFS.
- Open an Administrative PowerShell window and enter:
NETSH HTTP SHOW SSLCERT
This will provide a listing of your current ADFS ports (443 and 49443), and should list the thumbprint values for the old certificate we’re replacing.
Now enter the following command placing the new thumbprint value in the command as shown:
Set-AdfsSslCertificate -Thumbprint <newthumbprinthere>
Now if you rerun ‘NETSH HTTP SHOW SSLCERT’ as before you’ll notice two sets of bindings. One for the old certificate bound to the local internal host name of the server, and a second listed for the new certificate and the update public domain name. Now we just need to enter the following commands to delete the old SSL bindings:
netsh http delete sslcert hostnameport=example.localhostname.ad:443
netsh http delete sslcert hostnameport=example.localhostname.ad:49443
- Finally, open the windows ‘Services’ dashboard, locate the service ‘Active Directory Federation Services’, right-click and restart the service.

- The ADFS certificate has now been changed over to the new SAN certificate and we are just about ready to test the functionality with the update cert.
- Since we have change the ADFS endpoint URL to now use the public domain name, we can no longer navigate to the previous local ADFS hostname URL. Therefor we need to navigate to the ADFS sign on page using the URL schema (where ‘adfs.publicdomain.com’ is replaced with your unique public DNS value:
*Note*
Since you are now attempting to reach the ADFS server using the public DNS value, you must either:
- Have your external WAN connected firewall configured to properly forward ports 443 and 49443 to the ADFS server.
- Manually create a new forward lookup zone for your domain name such as [publicdomain.com] in your local networks DNS server.
- Then add a new A record Host value in that new zone for ‘ADFS’, that points to the local IP address for your ADFS server.
Either option should work, but the exact configuration or which you choose will be unique to your organization network and architecture.
Preparing GID Services for External Access:
Next, we need to prepare the GID and GID User Manager services for external access. This will involve installing the SAN certificate we created earlier on the GID server, and configuring the GID services to use this updated certificate, and it’s associated public domain name.
- Head over to your GID server and login with administrative privileges.
- Open the Windows ‘Run’ window and launch ‘mmc’.
- Go to File, Add Snap-in, and Select ‘Certificates’ from the ‘Available Snap-ins’. Select the option for ‘Computer Account’. Click ‘Next’, select Local Computer, and click ‘Finish’, then Ok to add the Snap-in.
- Expand ‘Certificates’, Expand ‘Personal’, and right-click on ‘Certificates’, and select ‘Import’.

- On the first import screen, ensure ‘Local Machine’ is select as the ‘Store Location’ and click next.
- Browse for the location of the SAN Certificate we exported from our ADFS / CA server earlier. Ensure that you change the file extensions menu to ‘All Files’, to ensure the selection window can see all Certificate extensions. After locating the certificate select to open it.

- On the next screen, enter the password you set when exporting the certificate and its private keys earlier, and click ‘Next’.
- Confirm the location to import the certificate to as “Personal”, and then click next to finalize the import.

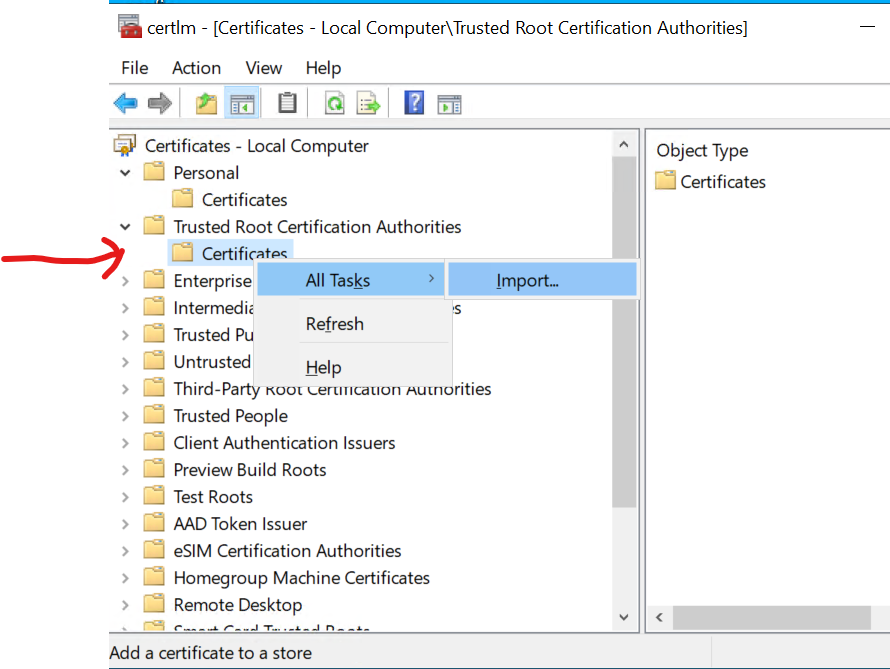
- Next we need to repeat steps 4-8 above. However, we will import the same certificate into the ‘Trusted Root Certification Authorities’, folder now.
Once complete, we should have the new SAN certificate installed in both Personal Certificates and Trusted Root CA Certificates.
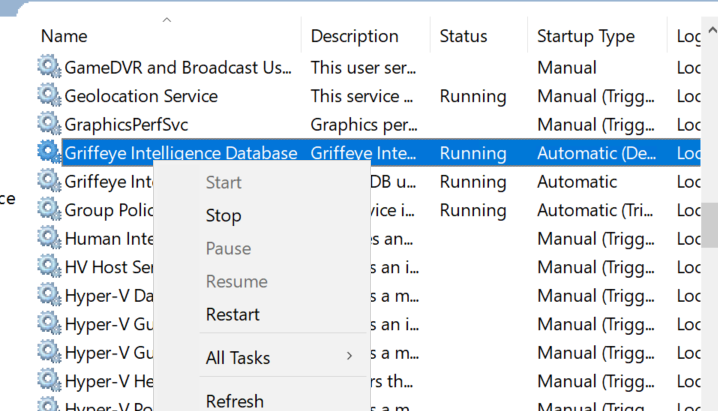
- Open the Windows ‘Services’ console, located ‘Griffeye Intelligence Database’ and right-click and stop the service.
Repeat this also stopping ‘Griffeye Intelligence Database User Management’.
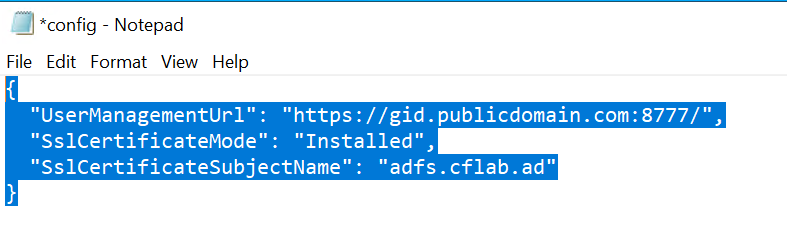
- Open file explorer and navigate to: ‘C:\ProgramData\Griffeye Technologies\GID’, and locate ‘config.json’, and open it with notepad.
- You should see at least two values entered if you previously walked through setting up the basic User Manger in our prior post. There should be URL that matches the local hostname of your GID server, and by default will use a ‘SelfSigned’ certificate. We’ll be changing both of these values.
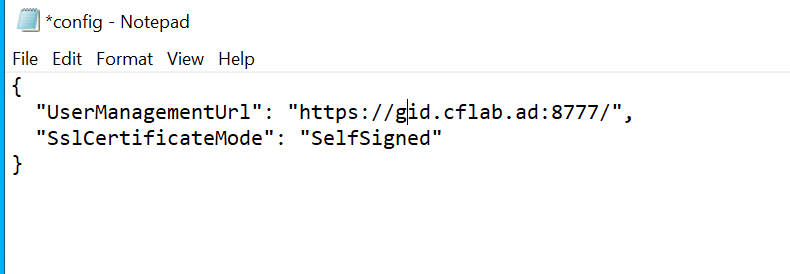
- Make the following changes/additions making special note of correct use of comma separators and Quotation Marks:
- First change the ‘UserManagmentUrl’ to reflect the external public domain name remote users will use when connecting to your GID from external network.
- Change the ‘SslCertificateMode’ to “Installed”.
- Add a new entry for ‘SslCertificateSubjectName’, and add the correct Subject Name value that identifies the SAN certificate you installed in steps 1-8 of this section.
- Save and Close the file.
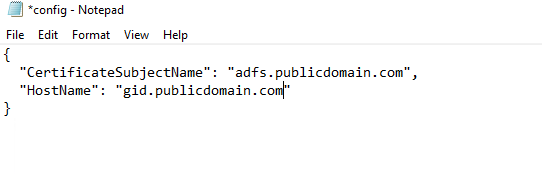
- Now open file explorer and navigate to: ‘C:\ProgramData\Griffeye Technologies\GID User Management’, and locate ‘config.json’, and open it with notepad. This JSON file will likely be ‘empty’, having only a set of open/closed curly brackets.
- Make the following changes/additions making special note of correct use of comma separators and Quotation Marks:
- Add a new entry for “CertificateSubjectName”, and add the correct Subject Name value that identifies the SAN certificate you installed in steps 1-8 of this section.
- Add a new entry for “HostName”, and add the external public domain name remote users will use when connecting to your GID from external network.
- Now with those configuration changes in place return to the Windows ‘Services’ console, located ‘Griffeye Intelligence Database’ and right-click and start the service.
Repeat this also starting ‘Griffeye Intelligence Database User Management’. If both services start without issue we can now proceed to making some final adjustments within the ‘Griffeye User Management’ Web Dashboard.
If you receive any error starting the services, a few things to check for are that you have correctly entered the matching Certificate Subject Name in each config file, that you have used proper JSON formatting, and that the associated SAN certificates were correctly imported onto the GID server as we covered earlier. Consulting the GID and GID User Manager logs will generally provide a fairly clear indicator as to where any issues might be.
- Open a browser and navigate to:
Logon using the local GID User Management Admin account you previously setup.
Do not try logging in using the ADFS option as this is likely broken at the moment until we update the URL.
- Navigate to Authentication Providers, and locate the ADFS Authentication provider entry you add during the initial local ADFS setup process and click the pencil icon to edit the entry.
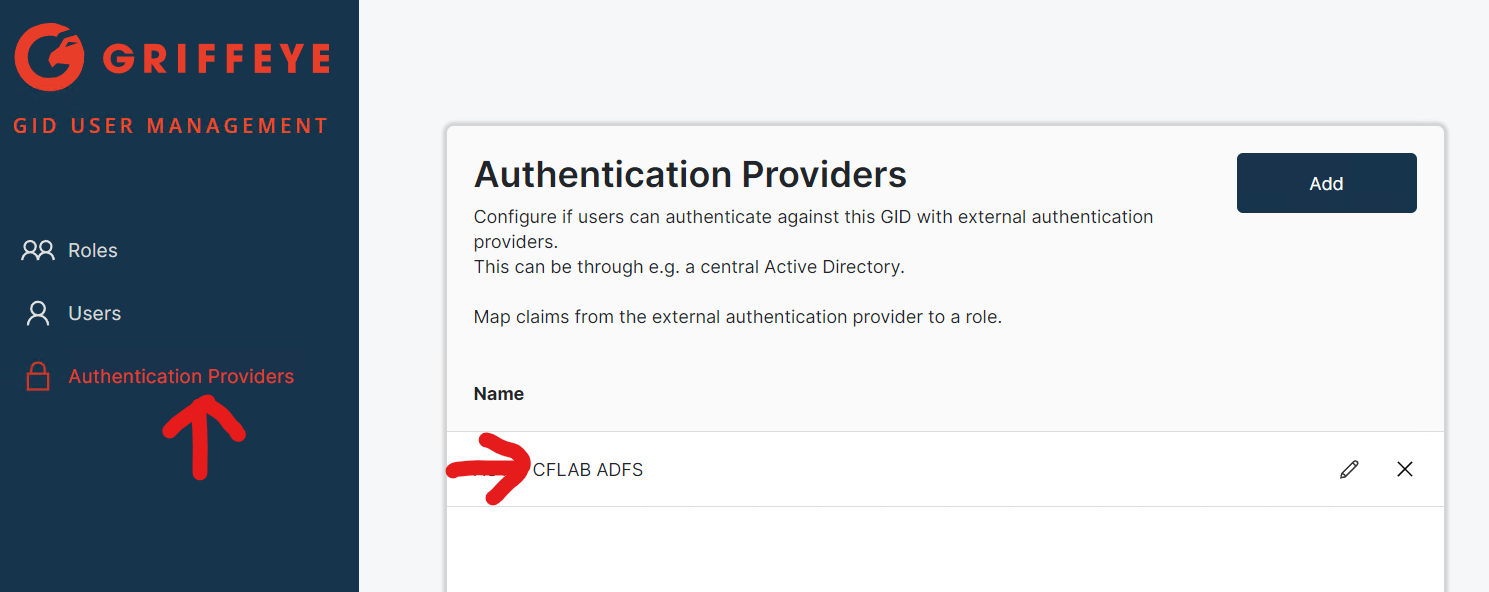
- Now locate the ‘Uri’ field and note that it points to the old local hostname for your ADFS server. Update this URL to reflect the new public domain name ADFS endpoint we configured ADFS to use earlier in the above steps, and click ‘Save’.

- Next go to the Windows ‘Services’ on the GID Server and restart the ‘Griffeye Intelligence Database User Management’ service.
- After restarting you should now be able to reach the GID and GID User Management portal using the public domain name, and have working ADFS authentication again, with the following considerations:
*Note*
Since you are now attempting to reach the GID server using the public DNS value, you must either:
- Have your external WAN connected firewall configured to properly forward ports 8778 and 8777 to the GID server.
- Manually create a new forward lookup zone for your domain name such as [publicdomain.com] in your local networks DNS server.
- Then add a new A record Host value in that new zone for ‘GID, that points to the local IP address for your GID server.
Either option should work, but the exact configuration or which you choose will be unique to your organizations network, security practices, and architecture.
This should now have you setup with a ADFS connected GID, that is accessible outside your local network.
In another follow-up post, we’ll dive further into some additional security considerations and best practices, that you may also want to consider putting in place for extra security hardening.